 MatTested
Mountain pose Tadasana, step by step for beginners
How to do mountain pose step by step, how far apart your feet should be, the mistakes I see most often, and what to do with your hands.
- For every level
- Hold for one breath or longer
- Starts every sun salutation
The asana in one breath
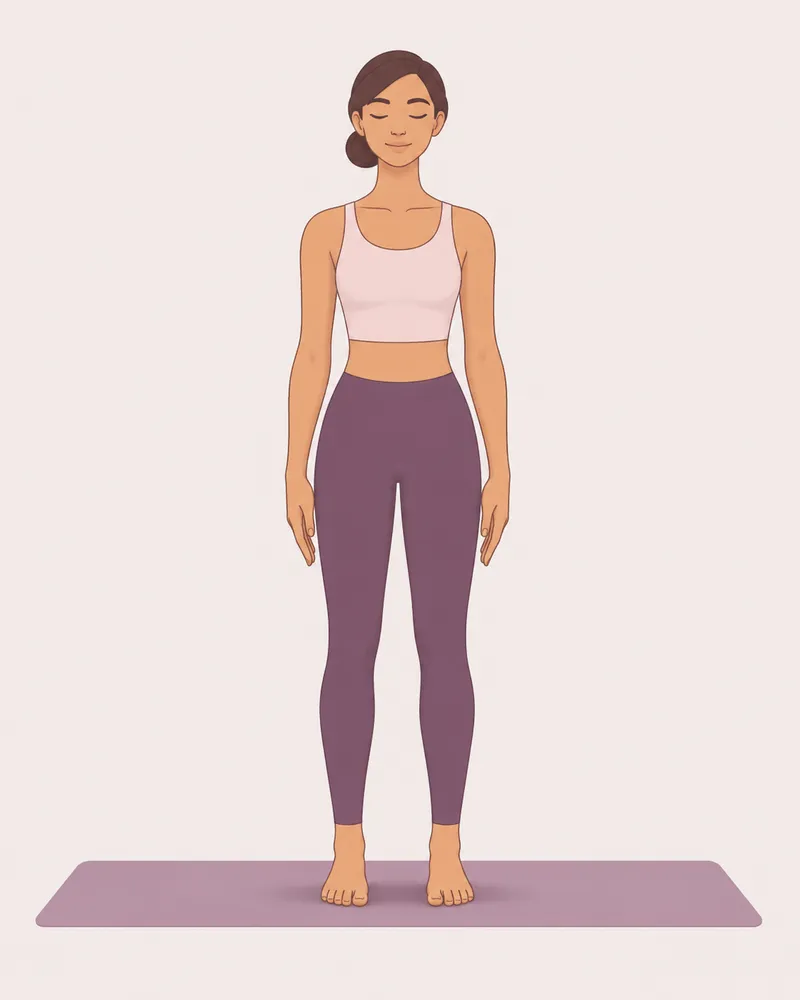
Mountain pose is about standing calm and steady. Feet parallel and hip-width apart, weight even through both feet, a long spine and relaxed shoulders. Then simply breathe.
- The starting and ending position of every sun salutation.
- Not sure how far apart your feet should be? Take a small jump, and let your feet land where they want.
- Knees soft, shoulders relaxed, chin level.
- Hands by your sides, palms open to the front, or together in front of your chest.
- You'll feel
- Steady through your feet, and calmer with every breath.
 By Emilija, RYT 200 certified yoga teacher
Updated
What is mountain pose (Tadasana)?
Mountain pose, or Tadasana in Sanskrit, is the asana where you stand tall at the front of your mat, feet hip-width apart, arms relaxed by your sides, and simply breathe. It's the starting and ending position of sun salutations, so you'll come back to it many times in a yoga class.
From the outside, it looks like ordinary standing. The difference is your attention. In Tadasana you notice your feet, your posture and your breath, and that's what turns standing into an asana.
The goal of mountain pose: to feel calm and steady
The purpose of Tadasana is to be calm. You stand steady on both feet, your body is upright but relaxed, and you breathe. There's nothing to push and nothing to achieve here.
That's why it's a lovely way to begin your practice. A few calm breaths help you arrive on the mat before you start moving. If you're a beginner, don't worry about breathing in a special way. Just breathe, and let your breath slow down on its own.
How to do mountain pose, step by step
- Stand at the front of your mat. Feet parallel, toes pointing forward.
- Place your feet hip-width apart. Not sure how wide that is? The small jump in the next section will show you.
- Spread your weight evenly through both feet, front and back, inner and outer edges.
- Keep your legs straight, with your knees soft. Don't lock them.
- Lengthen your spine and relax your shoulders away from your ears. Keep your chin level and your neck long.
- Let your arms rest by your sides, palms facing your thighs. Or choose one of the hand variations below.
- Close your eyes or keep a soft gaze, and breathe. Stay for one breath or as long as you like.
- Shoulders relaxed, away from your ears.
- Arms relaxed by your sides, palms facing your thighs.
- Knees straight but soft, not locked.
- Feet parallel and hip-width apart.
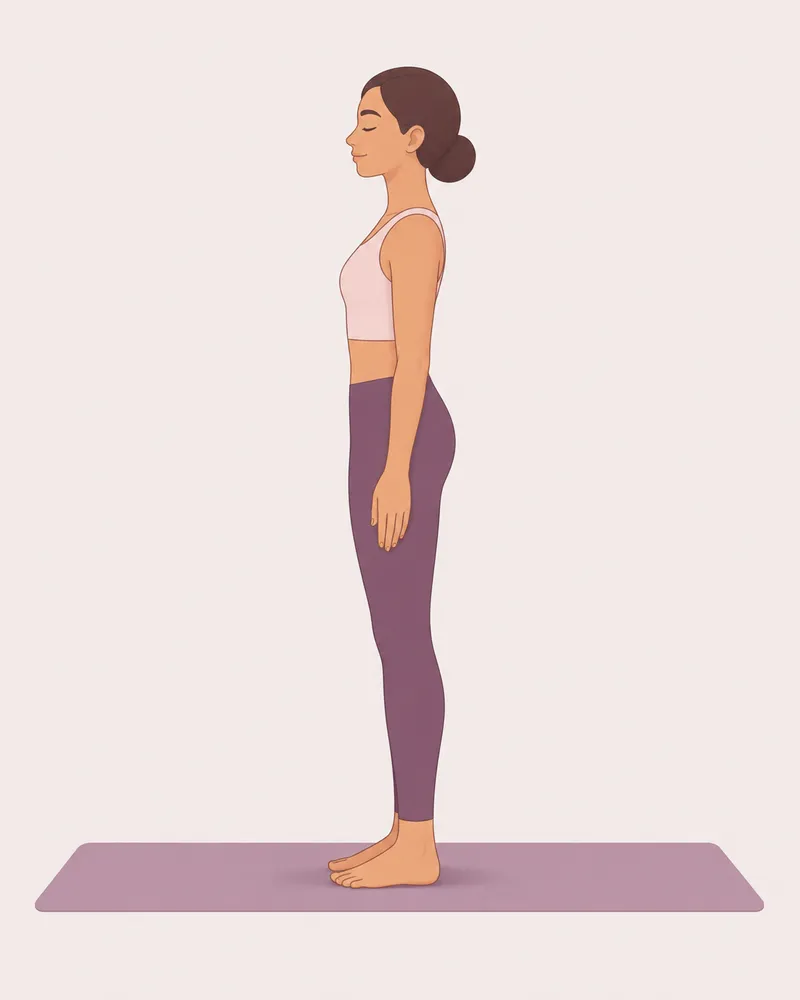
- Tall from your feet to the top of your head, ears above your shoulders, shoulders above your hips.
- Your lower back keeps its natural curve.
- Weight spread through the whole foot.
From the front, your feet are parallel and your whole body is relaxed. From the side, you're tall from your feet to the top of your head, with your ears above your shoulders and your shoulders above your hips. Your spine keeps its natural curves, so you don't need to flatten your back or arch it.
How far apart should your feet be in mountain pose?
Foot distance is one of the most important parts of the pose. I teach Tadasana with the feet parallel and hip-width apart.
But hip-width isn't the same for everyone, and it can be hard to feel. So here's what I do in class: take a small jump, and let your feet land wherever they land. That's the distance your body likes best. Then turn your toes to point forward, so your feet are parallel.
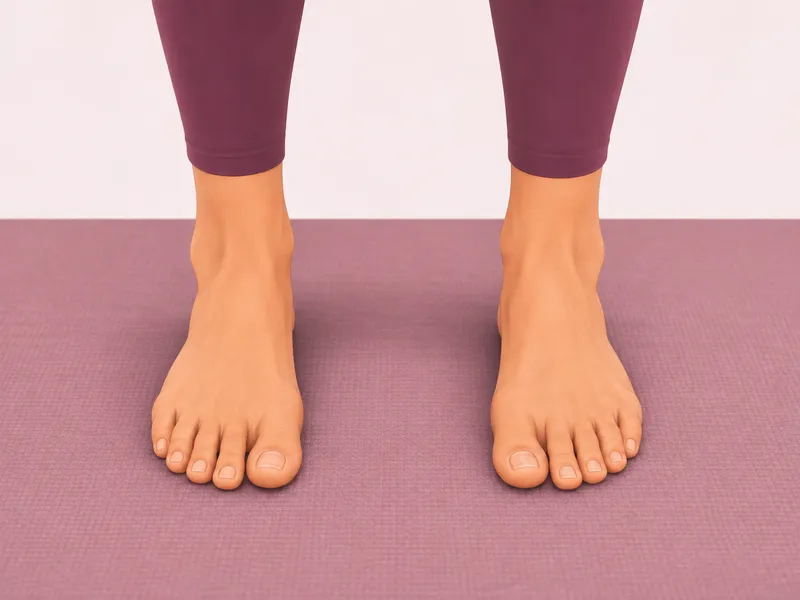
- Feet parallel, toes pointing forward.
- Hip-width apart, or wherever your feet land after a small jump.
- Weight spread evenly through the whole foot, without rolling onto the inner or outer edges.
Once your feet are in place, notice where your weight is. If you lean toward your toes or your heels, or roll onto the edges of your feet, gently shift until your weight feels even through both feet.
Common mistakes in mountain pose
It looks simple, so it's easy to stand in it the way we stand every day. These are the three mistakes I see most often.
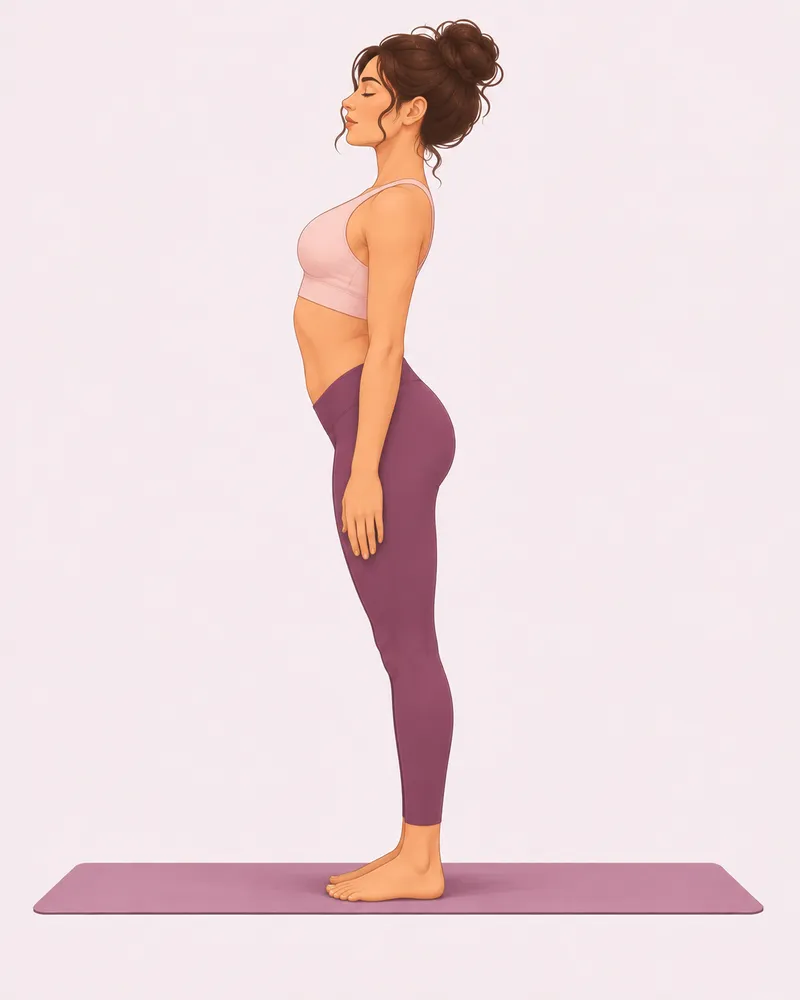
- The lower back arches.
- The belly and chest push forward.
- The knees lock and push back.
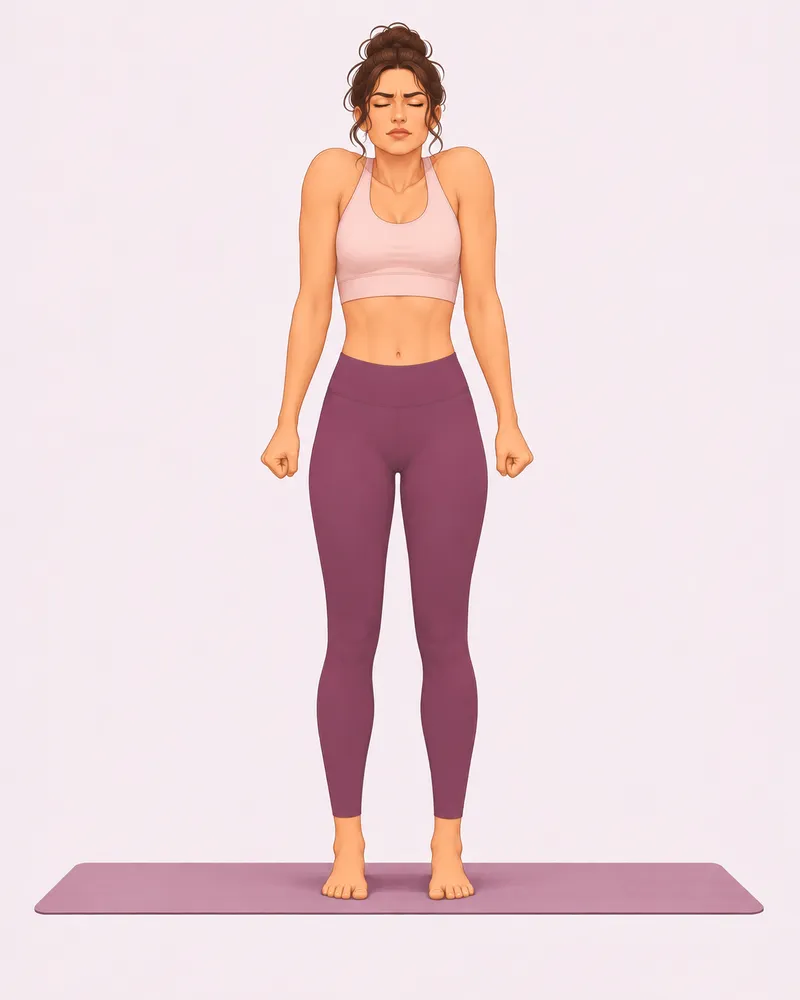
- Shoulders lift up toward the ears.
- Arms stiff and hands clenched.
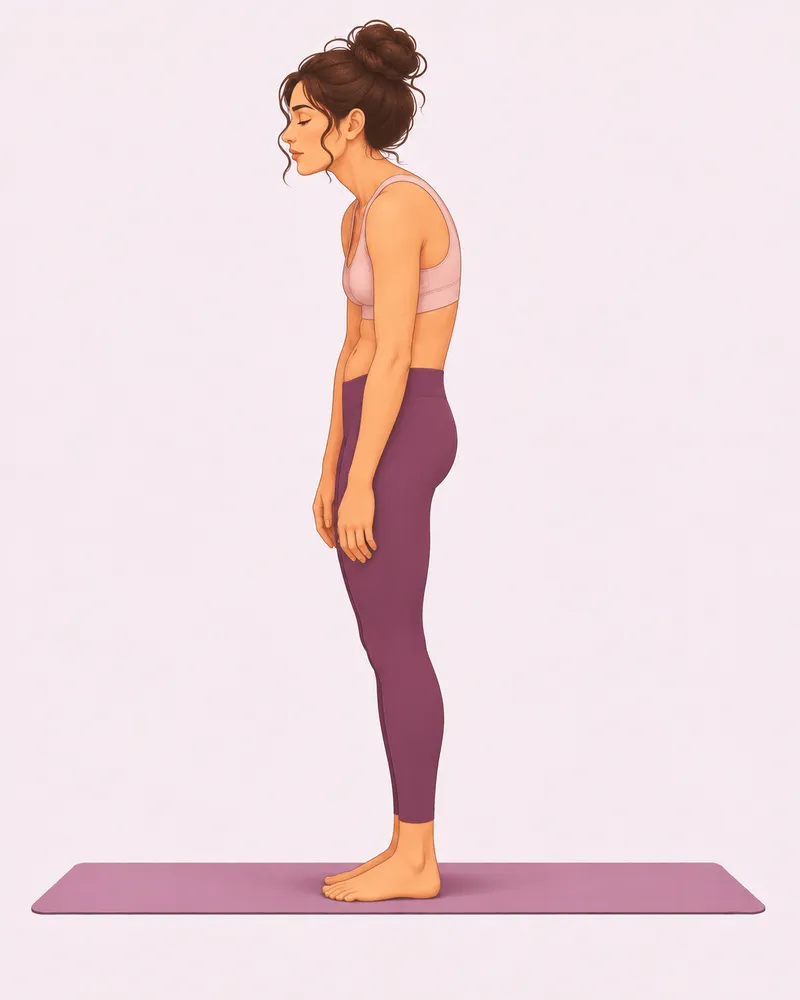
- The shoulders round forward and the chest sinks.
- The head drifts forward of the shoulders.
- The hips push forward.
How to fix them
- Arched lower back and locked knees: soften your knees and let your belly relax back in. Your lower back keeps its natural curve, without your belly and chest pushing forward.
- Shoulders up by your ears: breathe in, and as you breathe out, let your shoulders drop away from your ears. Relax your hands and fingers too.
- Slumped shoulders and a sinking chest: stand tall from your feet up, roll your shoulders gently back and down, and bring your head back above your shoulders.
Mountain pose variations: what to do with your hands
Your arms can rest by your sides with your palms facing your thighs, like in the images above. Here are two more options I use in class.
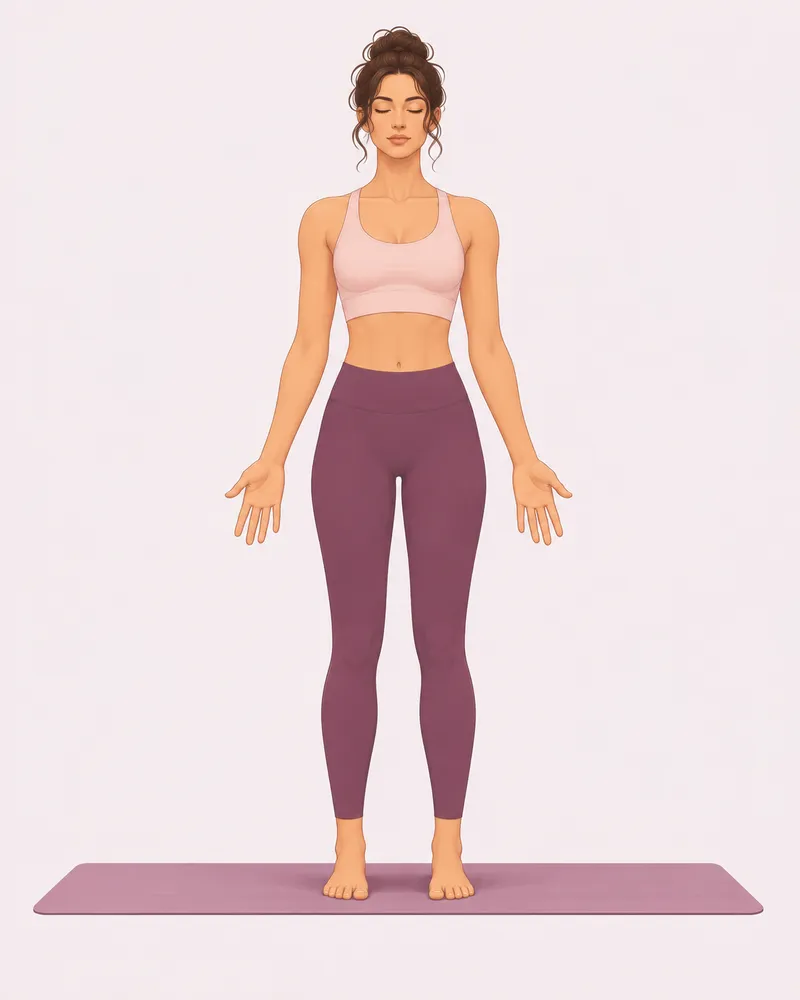
- Palms open toward the front, fingers relaxed.
- Arms long, a little away from your body.
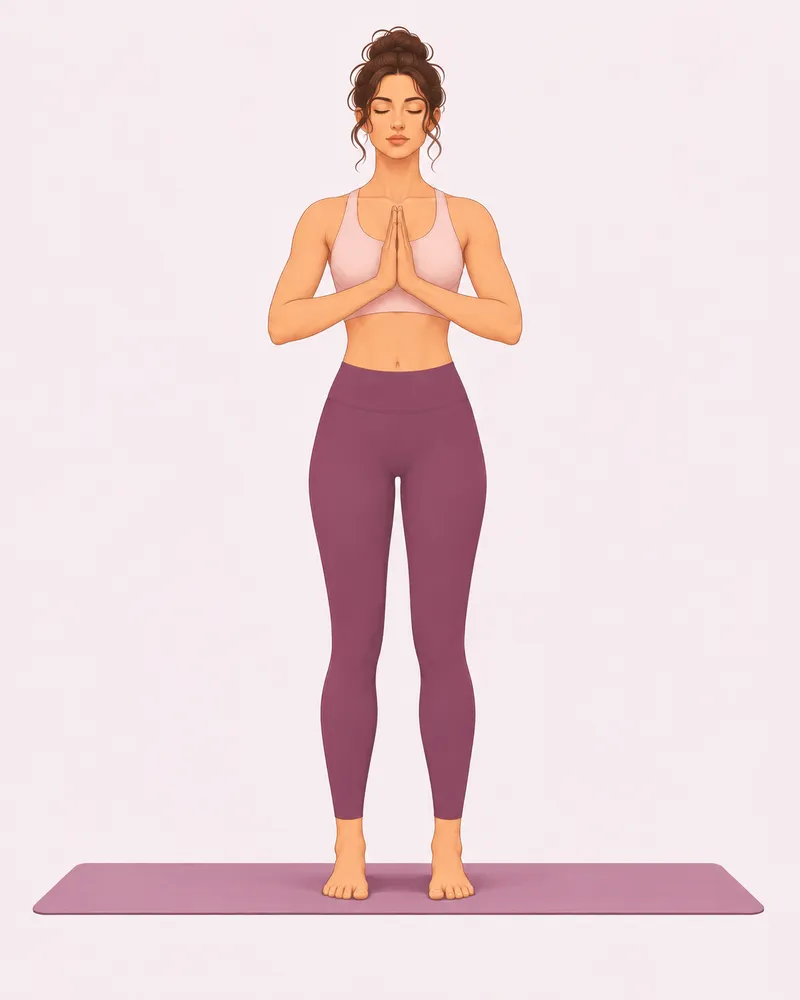
- Palms together in front of the center of your chest.
- Elbows relaxed.
- Shoulders soft and down.
Palms open toward the front
Keep your arms long by your sides and turn your palms to face forward, fingers relaxed. Your arms move a little away from your body, and your chest feels a little more open.
Palms together in front of your chest
Bring your palms together in front of the center of your chest, in namaskar. Keep your elbows and shoulders relaxed. This is how we often begin and end a sun salutation.
Different ways to come into and out of mountain pose
Sun salutations begin and end here, so you'll often come into it with your arms coming down, and move out of it with your arms reaching up or your knees bending.
| Position | Into the pose | Out of the pose |
|---|---|---|
| Arms reaching up (Urdhva Hastasana) | Breathe out and lower your arms by your sides, or bring your palms together in front of your chest. This is how Sun Salutation A ends. | Breathe in and reach your arms up toward the ceiling. This is how Sun Salutation A begins. |
| Chair pose (Utkatasana) | Breathe out, straighten your knees and lower your arms by your sides. This is how Sun Salutation B ends. | Breathe in, bend your knees and send your hips back, as if you were sitting on a chair, and reach your arms up. This is how Sun Salutation B begins. |
When to use mountain pose in your practice
- At the start of your practice: a few calm breaths in Tadasana help you arrive on the mat.
- In sun salutations: Sun Salutation A and B both begin and end here. In a flow, you may stay for just one breath.
- Whenever you need to calm down: stand, close your eyes and take a few slow breaths.
Next, learn downward facing dog, another asana you'll meet in every sun salutation. New to yoga? Take my yoga and Pilates quiz to find a style that suits you, and explore more asanas in the asana library.
This guide shares how I teach the asana and isn't medical advice. If closing your eyes makes you feel unsteady, keep them open with a soft gaze. If you have a health condition or you're pregnant, check with your doctor before starting a new practice.
FAQ
How far apart should your feet be in mountain pose?
Hip-width apart, with your feet parallel. If you're not sure how wide that is, take a small jump and let your feet land naturally. That's the distance that suits your body.
What does Tadasana mean?
Tada means mountain and asana means pose, so Tadasana is mountain pose.
How long should I hold mountain pose?
It depends on your goal. In a sun salutation it may last just one breath. At the start of your practice, or whenever you want to calm down, you can stay for as long as you like.
What do I do with my hands in mountain pose?
Let them rest by your sides with your palms facing your thighs. You can also turn your palms to face forward, or bring them together in front of your chest.
Should I lock my knees in Tadasana?
No. Keep your legs straight but your knees soft, so the pose stays steady and relaxed.
Is mountain pose just standing?
It looks like standing, but in this pose you're aware of your feet, your posture and your breath. The goal is to feel calm and steady.
Can I close my eyes in Tadasana?
Yes, closing your eyes can help you feel calm. If it makes you feel unsteady, keep them open with a soft gaze toward the floor in front of you.
Written by Emilija
I write every asana guide on this site the way I teach it in class: step by step, with options that meet you where you are.